
GrandMA 3 – Sequences and Executors
Cues in Sequences on Executors
We have already stored some things on our Executors. When we did this, the console did the following steps in the background
- Data is stored in a Cue
- The Cue is placed in a Sequence
- The Sequence is assigned to the Executor
In this chapter we will have a more detailed look into these steps. First, please click on the different tabs to get some more information about the important elements in this workflow.
Select some fixtures and create a look. The attribute data can be stored into Presets or directly into a Cue.
Presets have the advantage that you can use them repeatedly in different Cues. Afterwards you only have to adjust the Preset and the Cues are updated automatically.
So we get our data from Presets and create a Cue with them.
Cues can be created out of Presets or hard values from the Programmer. They are the looks we want to play back.
Your Cues are automatically stored in a Sequence. A Sequence contains one Cue or a list of Cues to play them back one after the other. It contains information like triggers, fade and delay times to define how the Cues will be played back.
A Sequence is always stored in the Sequence Pool. You can assign the same Sequence to different Executors and they will run synchroneously.
The Executors are the handles to control our Sequences. You can assign different functions on keys, faders and rotary encoders to customize the way you would like to interact with the Sequence.
Create and play back a Sequence
Knowing the structure of Cues, Sequences and Executors, let’s have a look at the workflow in detail.
In the video you will learn how to create and play back a Sequence with multiple Cues and we will have a look how to change some functions that you can use on your Executors.
Selected Sequence
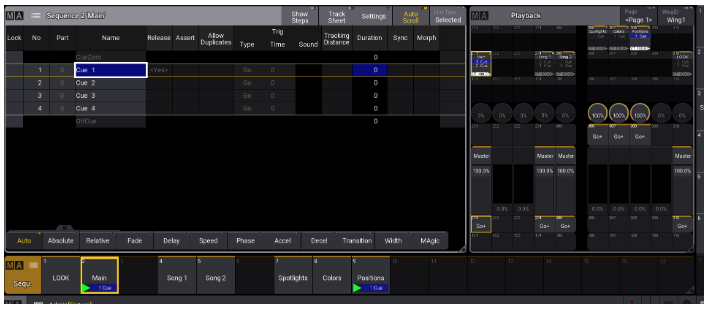
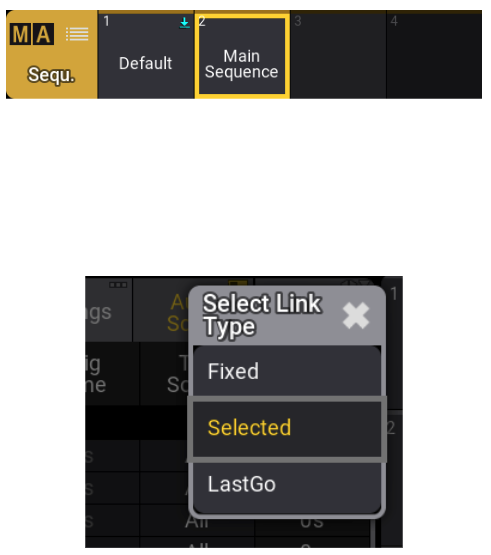
You can select a Sequence in the Sequence Pool by tapping on the pool object. This Sequence will then show a yellow frame in the pool.
The selected Sequence has a special role in our show file. By default, it can be controlled using the main Executor with the two 100mm faders and the big Go/Pause keys below. Furthermore, if you use commands like Store, Delete etc. without specifying a Sequence, they will always apply to the selected Sequence.
Example: Store Cue 3 Please will store Cue 3 in the selected Sequence.
By default the Sequence Sheet shows the selected Sequence. With the „Link Type” menu at the top right corner of the Sequence Sheet, you can change this to a fixed Sequence or the Sequence you hit go last.
OffCue
he OffCue can be used to define the behaviour when a Sequence is turned off.
You can set a fade and/or delay timing, Feature Group timings or even commands to be executed.
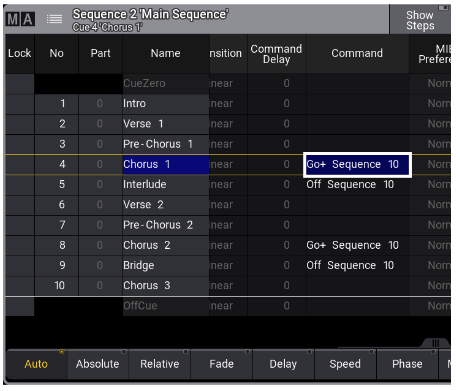
In the example below the Sequence will turn off with a fade time of 2 seconds and the console will jump to Executor Page 2.

Number
Every Cue has its own number to identify it within a sequence. You can change the number of the Cue in the column No. Remember the gesture controls? Just select a cell and tap on the screen with 2 fingers to change it.
When you change the number of a Cue, the following Cues will be renumbered automatically.

Name
As well as we already mentioned for Groups, Presets and Sequences, we recommend to label Cues with proper names. Naming your Cues means you will always recognise what is going on in that Cue or what you will have to keep in mind for the next Cue.
You can select a Cue name cell in the Sequence sheet and you will see a white frame around it, then just start typing a name with the internal keyboard or an external connected USB keyboard.
Cue timing
Scrolling a little bit to the right in the Sequence sheet you can find the column Cue with the sub-columns Fade and Delay.
Here you can set fade and delay times for each Cue. Let’s have a look at the video how this works.
Syntax overview:
[Store] [Cue] 3 [Time] 5 [Time] 2 [Please]
→ Store a Cue with fade 5s and delay 2s in the selected Sequence
[Time] 2 [Time] 4 [Please]
→ Change the timing to fade 2s and delay 4s in the current Cue of the selected Sequence
[Cue] 3 [Time] 2 [Time] 4 Please
→ The same timing as above for Cue 3 of the selected Sequence
[Sequence] 4 [Cue] 3 [Time] 2 [Time] 4 [Please]
→ The same timing as above for Cue 3 of Sequence 4
Out timing
In our Cues we can separate between In and Out timing.
The In timing takes care of what happens when we run the Cue – that’s what we’ve learned on the previous page. The Out timing can be used to treat decreasing Dimmer values differently.
So for example you could have a fade in of some fixtures in 3 seconds and some other fixtures fade out in just 1 second. Let’s see in the video how this works.
Syntax overview:
[Store] [Cue] 3 [Time] 5 / 6 [Time] 2 / 3 [Please]
→ Store a Cue with in fade 5s, out fade 6s, in delay 2s, out delay 3s in the selected Sequence
[Time] 2 / 3 [Time] 4 / 5 [Please]
→ Change the timing to in fade 2s, out fade 3s, in delay 4s, out delay 5s in the current Cue of the selected Sequence
[Time] 2 / 3 [Time] 4 / 5 [Cue] 3 [Please]
→ The same timing as above for Cue 3 of the selected Sequence
[Time] 2 / 3 [Time] 4 / 5 [Cue] 3 [Sequence] 4 [Please]
→ The same timing as above for Cue 3 of Sequence 4
Cue trigger
Let’s have a look at this video to learn more about different possibilities to trigger Cues. They can help to play back a Sequence automatically.
Commands in Cues
Scrolling to the right in the Sequence sheet you can find the column Command. It gives you the possibility to execute a command when you play back the Cue.
This can be helpful to start Sequences with Phasers etc. which should run in parallel to the current Cue. It might also be a command in the last Cue to change the Page for the next song. Just type in the command in the respective cell and it will be executed together with the Cue.
The column Command Delay can be used to set a delay time for the command. So when your command should not start directly with the Cue, just use a delay time here.
You can either use the hardkeys on the console or the internal keyboard to enter Cue Commands. It works the same way like entering them in the Command Line. When typing manually, the software will automatically recognize keywords and shortcuts.
Example: If you type seq, it will automatically translate into Sequence. This saves you a lot of time when typing commands!
Individual timing
Next to the basic timing of a Cue, we can also use individual timing for specific fixtures and attributes.
It is exactly the same that we used for timing in Presets – timing is directly connected to the value! Let’s have a look at this video how to use the individual timing directly in Cues.
Use the [MA] + [Time] key combination to toggle through the attribute layer – Relative, Fade, Delay, Absolute. The layer corresponds with the selected FeatureGroup.
Markers in Cues
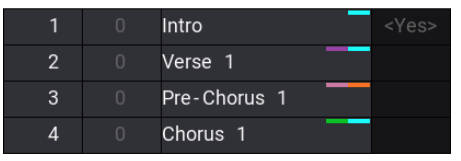
In the Sequence sheet you get some more information about your Cues when you have a look at the Name cell. Here you can see some markers in different colors.
Light Red – You have stored Relative values in this Cue.
Green – You have used individual fade times in this Cue. It can be fade times stored in the Cue directly or coming from a preset.
Orange – You have used individual delay times in this Cue. It can be delay times stored in the Cue directly or coming from a Preset.
Cyan – There is a Preset reference in this Cue. So you used a Preset to program your Cue and a reference to this Preset is stored. Hopefully many of your Cues have this marker :-).
Magenta – This is a Cue with a Phaser. So you stored values with more than one Step directly in the Cue or the Phaser is coming from a Preset.
Tracking
Before we change, copy or delete our Cues in a Sequence we have to understand the basic concept of Tracking. It is one of the most important but sometimes also a quite complex topic of the grandMA3 software. But it helps us a lot when we deal with our Cues.
Let’s have a look at this video to see how Tracking works and why it is so helpful.
Update Cues
If you want to modify a Cue there are some possibilities:
- Store new values to the Cue
- Update a running Cue
- Edit a Cue and update the values
In the video you will see how these different workflows can be used.
Cue only
Of course there might be some situations where we want to modify just a single Cue, without affecting the following Cues. Here you can use the Cue only function.
It takes care that changes are only stored in the Cue where you want to have it, not affecting the tracking of the following Cues in your Sequence.
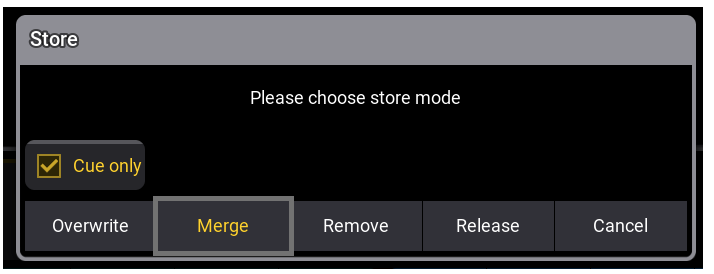
When you store some values to an existing Cue, you can select the Cue only option in the Store mode pop-up. The other Cues will then not be affected by these changes.
Delete and insert Cues
As well as changes in Cues, also deleting and inserting Cues affects the Tracking in your Sequence. If you delete a Cue with a stored value, which is tracked into following cues, of course the Tracking will change in this case.
The syntax to delete a Cue is:
[Delete] [Sequence] 1 [Cue] 3 [Please]
This can also be combined with the Cue only option, to avoid that following Cues are affected. The pop-up below will be shown when you delete a Cue from a Sequence.

To insert a Cue you can make use of the Cue number. To insert a Cue between an existing Cue 1 and 2 you can simply type:
[Store] [Sequence] 1 [Cue] 1.5
With this operation you will also get a Store pop-up containing the Cue only option.
Copy Cues
With the [Copy] command you can copy Cues within a Sequence or between different Sequences. The syntax is pretty easy:
[Copy] [Cue] x [At] y [Please] (for the selected Sequence)
[Copy] [Cue] a [Sequence] b [At] [Cue] x [Sequence] y (for Cues from different Sequences)
But beside this there are a lot of options and possibilities. Let’s have a look at the video to get an overview of the most important things:
Auto Start / Auto Stop
On the next pages we will have a look at some basic Sequence settings. They are relevant for the practical use of your Sequence and when you work with some more Sequences at the same time.
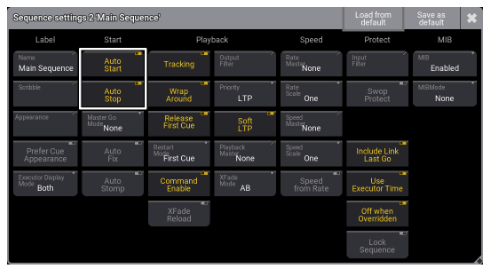
You can enter the Sequence settings via the Settings button in the title bar of the Sequence sheet. Or you press [Edit] [Edit] to get the EditSetting keyword and tap on the Sequence object in the pool or an Executor where the Sequence is assigned.
The second column shows you some settings which are relevant for the start behaviour of your Sequence.
Auto Start
Switches the Sequence on when the master fader is moved above zero. So you run your first Cue directly when moving the fader up.
Auto Stop
Switches the Sequence off when the master fader is moved to zero.
Auto Fix
Auto Fix is turned off by default.
When Auto Fix is active, a running Sequence will be automatically fixed on the Executors where you use it. That means that it is also available on the same Executor when you go to another Page.
You can change the Executor Page with the [Page+] and [Page-] keys on the console. When Auto Fix is switched on, the Sequence will be visible on the Executor on every page.
Therefore Auto Fix is very useful for Sequences you always want to have under control, no matter on which Executor Page you are on.
Playback priorities
Next to the Start column you can find the Playback column. Here you can find some settings which are relevant for the playback behaviour of your Sequence.
You have already learnt that you can switch off the Tracking here. Another really important button is Priority. The priorities decide which values will be on the output if several Sequences are running.
The most common priorities are explained below.
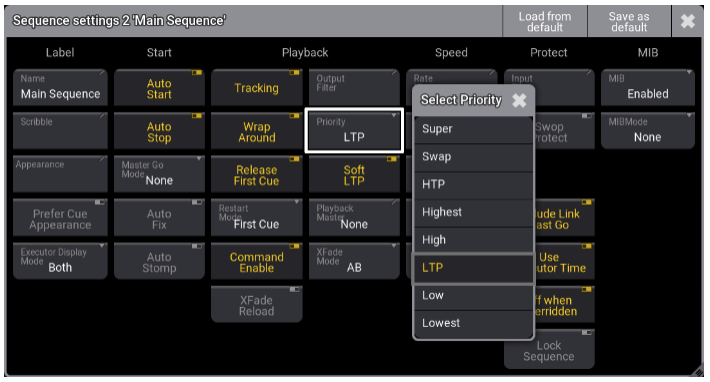
Latest Takes Precedence. The latest (most recent) values will be on the output.
The values will have a higher priority than normal LTP values.
The values will have a lower priority than normal LTP values.
Highest Takes Precedence. The highest Dimmer value will be used. Other attributes have LTP priority.
This is the highest possible priority. Your Sequence values will even have a higher priority than Programmer values, so be careful when using this priority.
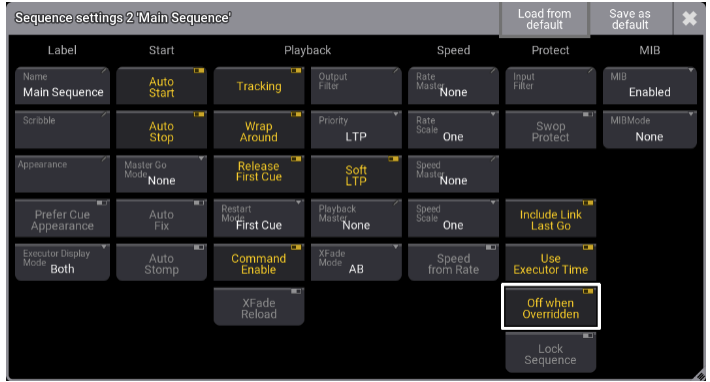
Off when Overridden
Off when Overridden is an option you can find in the column Protect. It is turned on by default.
This option switches off the Sequence when another Sequence has taken control of all the attributes that were controlled by the original Sequence before. Please have a look at this video for a practical example.
Executor configuration
Even though we could run our Sequences directly from the Sequence pool, most times you are going to use an Executor as a handle to control your Sequence.
Please press the [Assign] key followed by the key of an Executor to open the Executor configurations. In this menu you can change all settings of an Executor, e.g. the assigned Sequence, the Appearance to change the RGB backlight or the labelling.
You can also change the configuration of keys, faders and rotary knobs. You can even change the overall size of your Executor.
Handles
The hardware handles provide you huge flexibility to control your Playbacks. With the different functions you have many possibilities to control your Sequences or other objects on the Executors.
Here you can find some common functions for the keys, faders and rotary knobs.
Key functions
Runs the next Cue in your Sequence. If your Sequence is off, it activates the first Cue.
This is the default function for an Executor key with a fader.
Runs the previous Cue in your Sequence. If your Sequence is off, it runs the last Cue.
Flash overrides your master fader and sets it to 100% as long as you press the key. If your Sequence is off, the Sequence will be temporarily activated with zero timing.
A practical example could be a an Executor with your blinders at 100%. With Flash you can manually flash them in when you need it.
Black overrides your master fader and sets it to 0% as long as you press the key.
So it can be perfectly used to black out a specific Sequence for a moment.
Switches your Sequence on and off.
Toggle is very useful for Executors which are running Phasers – you can use the key to start and stop the Phaser.
Turn on the executor.
Turn off the executor.
Temp is similar to Flash, but it respects Cue timings when pressing and releasing the key. You can use it together with Cue timings and OffCue timings to create softer flashes.
Fader
The master fader controls the dimmer values of your Sequence. You can use it to adjust the dimmer proportional to the programmed dimmer values in your Cues.
Please remember the Auto Start / Auto Stop settings for your Sequence.
While a Master only adjusts Dimmer values, a Temp fader adjusts the levels of all attributes. The Temp function uses fade times from Cues and individual timings. Furthermore it respects the level set by the intensity master.
If you want to mix colors using faders (e.g. red, green and blue on separate executors) you need to use the Temp fader function.
Crossfades between two Cues, current Cue and next Cue. The current Cue will change when the fader reaches the other end position from where it started.
Controls the speed of Phasers running on this Executor.
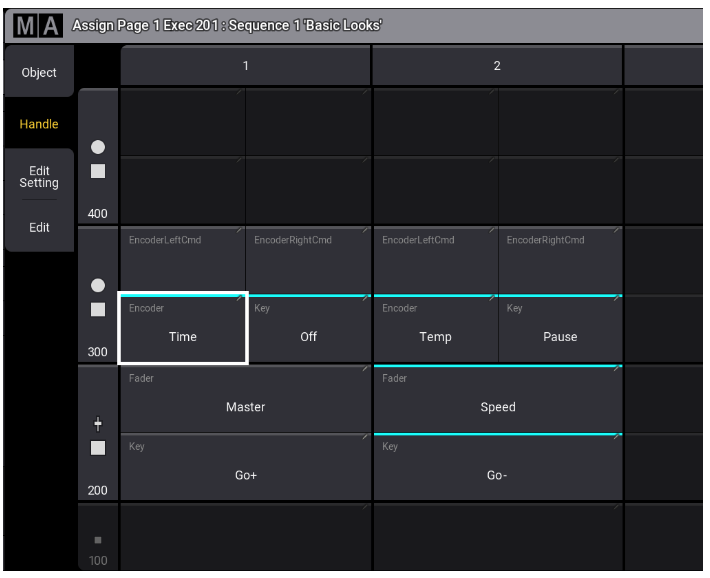
Rotary Knobs
If you assign '<<<’ as EncoderLeftCmd and ’>>>’ as EncoderRightCmd, you can use the rotary knob to quickly jump back and forth in your Cues without applying Cue timings. One click left will go to the previous Cue, one click right will go to the next Cue.
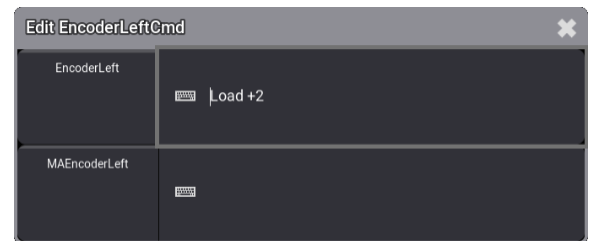
Although the Load +/- action is not available as a key function, you can still assign it as EncoderCmd by typing the command „Load +1” or „Load -1” in the text field like in the picture below.
Load prepares a specific Cue in your Sequence. The loaded Cue will be run on the next Go+ command instead of the next Cue.
If you assign „Load -1” as EncoderLeftCmd and „Load +1” as EncoderRightCmd, you can use the rotary knob to load any previous or next Cue in your Sequence.
The rotary knobs can either act like a fader (adjust an absolute value between 0 and 100%) or like a key (execute the key function each time the knob is turned one click left or right).
Below you can see some functions that are useful for the EncoderLeftCmd and EncoderRightCmd assignment.
Group master
In the Assign menu of an Executors you can find the Object tab at the top left corner. In this menu you can find all objects that can currently be assigned to an Executor.
Selecting Group will give you an overview of all your Groups in the showfile. You can assign these groups directly to an executor to create a Group master.
A Group master controls the dimmer values of this Group. It is very helpful to limit or adjust the intensity for a group of lights.
There are several modes for Group masters. Please have a look at the video to learn how they work.
Speed master
You have already learnt that you can use the Speed function on an Executor fader to control the speed of Phasers running on this Executor. But what if you want to control the speed of multiple Phasers from different Executors? That’s where Speed masters can help you.
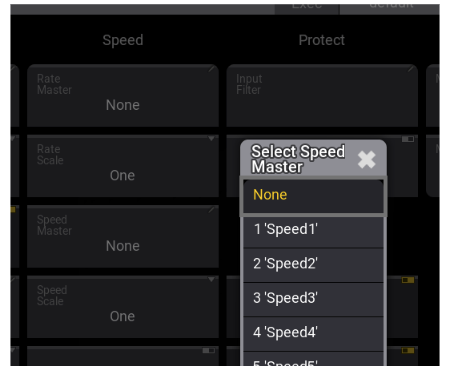
In grandMA3 there are a total of 16 Speed masters. Assigning a Speed master to an Executor is very similar to assigning a Group master. Just go the Assign menu of an empty Executor, go to Object – Master – Speed and select one of the Speed masters.
You can then link Sequences to that Speed master by selecting it in the Speed column of the Sequence settings.
Adjusting the Speed of that Speed master will then change the Speed for all Sequences that have this Speed master assigned.