GrandMA 3 – Basics

The grandMA3 range offers a complete system solution with ground-breaking concepts. The physical design is focused on delivering the best possible user experience.

We can divide the grandMA3 range in 3 different sections:

The console range offers a wide collection of lighting control hardware, from the grandMA3 full-size console to the smaller grandMA3 compact models. Additionally there are network devices to add parameters and to transport DMX data.

A system with grandMA3 consoles is scalable to 250.000 parameters to match the requirements of the biggest existing shows.

The grandMA3 onPC software can be downloaded for free, to get the first experience in the grandMA3 world. Together with a huge variety of onPC control solutions we get a wide range of lighting control systems. Starting with a simple Node which delivers 2.048 parameters up to a maximum of 4.096 parameters in combination with different onPC devices.

And the best thing – the onPC products can also work as a backup in a system with consoles up to 250.000 parameters!

You think about getting external signals like MIDI or Timecode to your system, but you do not have a direct connection to your console? Or you want to prep your show and make use of an external visualiser? The grandMA3 connected range can help!

What is a parameter?

MA distinguishes between a raw DMX channel and a parameter. Let´s think about the PAN movement of a moving light.

Normally you have PAN and PAN fine, so a 16bit DMX channel for the PAN function. So we would have two 8bit DMX channels. For MA this is only one function, means only one parameter.

The benefit for us is that we only have to count one parameter instead of up to three DMX channels (24bit resolution).

Install the grandMA3 onPC

If you do not have any grandMA3 hardware, the onPC software is your first step and the easiest way into the world of grandMA3. Please have a look at this video to learn how to download the software and install it on your computer. 

With the onPC solutions you can unlock parameters for the onPC software, to control a real show. The amount of DMX outputs varies with each onPC product but all of them unlock 4 096 parameters for the full grandMA3 software functionality.

grandMA3 onPC command wing XT

The grandMA3 onPC command wing XT is the console solution within the onPC range. It provides a built-in, genuine MA motherboard with the preinstalled grandMA3 onPC software. Just add a touchscreen monitor and it´s ready to go!

  • Real-time control for 4 096 parameters in combination with grandMA3 onPC software – pre-installed on built-in MA motherboard
  • Command section same as grandMA3 onPC command wing
  • 29 rotary RGB backlit encoder
  • 5 dual encoders
  • 10 motorized 60mm faders
  • 40 separate playbacks
  • 16 assignable x-keys
  • 2 motorized A/B faders 100mm
  • 1 Level-Wheel
  • Individually backlit and dimmable silent (clickless) keys

Layout screen

Here you can see the basic layout of your screen when you start the grandMA3 onPC software. It is also the layout you will find on the screens 1-5 on your console.

Click on the information buttons with your mouse to get some information about the different areas.

Main menu bar

Here you can enter the menu or change to command controls, master or playback windows. Furthermore you can enter the help or the At bar and you can lock your console. 

You can hide the bar with the left arrow at the bottom.

Empty window space

This is the space for your personal views or the default views. Here you can combine windows, sheets and pools to create your views you always need. We will learn how to create a view very soon.

View button bar

In the view button bar you can store your personal views. In a new show you will find some predefined views here.

Press on a view button to call the specific view on this screen. 

You can hide the view bar with the right arrow at the bottom.

Command Line

The command line is the central element of all commands entered in your console. There is no difference in working with the graphical user interface or typing in the command line. With the MA button on the left you can open the command line feedback to have an overview of your last commands and actions.

Empty window space

This is the space for your personal views or the default views. Here you can combine windows, sheets and pools to create your views you always need. We will learn how to create a view very soon.

View button bar

In the view button bar you can store your personal views. In a new show you will find some predefined views here.

Press on a view button to call the specific view on this screen. 

X-keys

Here you can see what is assigned on the 16 x-keys on your console. 

This is only visible on screen 7 because this is the screen directly above the x-keys. On screen 6 you have more empty window space.
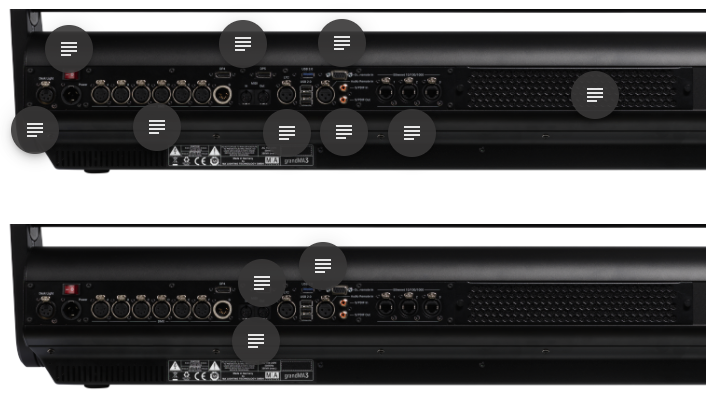
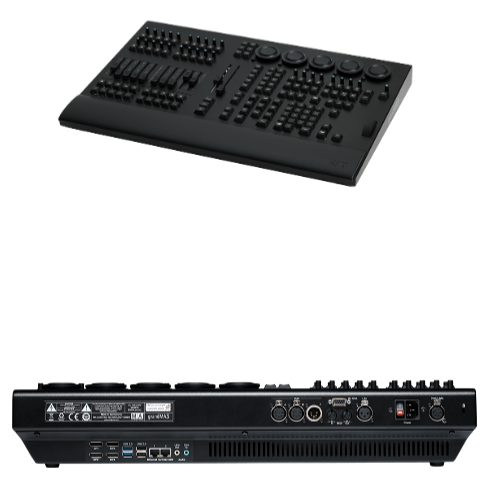
Back panel

Desklights

Power connection and Main Power On/Off switch

DMX outputs and input

  • Per default XLR 1-6 are the outputs for DMX universe 1-6. This assignment is changable in the output configuration menu.
  • Every DMX output can also be an input and vice versa.

Display port connections for external touchscreens

Sound input

7 analog inputs

S/PDIF In&Out

Ethernet connectors

Airfilter

(should be cleaned from time to time)

USB 2.0 & 3.0

SMPTE Timecode

MIDI In&Out

Starting the console

Now we can start our grandMA3 console! Please have a look at this video to see the booting process and the use of the dustcover.

Maintenance

Here you can get some tips regarding the maintenance of your grandMA3 console. Please keep in mind that the intervals between maintanance may differ depending on the frequency of transport and the operational environment.

  • Disconnect power supply before cleaning.
  • Clean the filter on the backside of grandMA3 full-size and light consoles with a vacuum cleaner only. Do not wash the filter.
  • Clean the surface using a dry cloth only.
  • Clean the wrist rest using a damp cloth only.
  • Do not use liquid cleanser or compressed air.
  • Do not use solvent.
  • Check if the ventilation holes are blocked.

Depending on the environment where you use your console, we recommend to professionally clean the device once a year. Just get in contact with your local distributor, they are happy to help you.

Software version

The software version is very important in your grandMA3 system. All the devices that should work together in a network have to run the same software version. Your showfiles also have to be compatible with the software version that you use.

What does this mean?

When you save your show, the showfile always contains the information in which software version it was built. Furthermore, it will always be converted to newer software versions, meaning you can load the file and work with it in a newer version. We call this upwards compatibility.

It is not possible to use a showfile in an older software version because of new functionalities and improvements which might not be implemented in the older version.

You can find the current software version in the download section of the MA Lighting homepage (www.malighting.com).

Please keep in mind, this training requires grandMA3 software version 1.7 or later! So please make sure that you use the latest software version to work on your training showfile.

For more information about the software update please have a look at the manual or get in contact with your local distributor or the MA Tech-Support Team.

Showfile handling

The showfile contains all the data which is relevant for our show – sequences, looks, presets, playbacks – everything is part of our showfile. So the handling of showfiles is a very important topic.

‍It is all done in the backup menu. Please press the Menu key on your console or the Menu button in the onPC and select Backup in the bottom left corner.

The top left corner shows you the name of the showfile which is currently loaded. So you have a good overview about your current status. It also helps sometimes to add a description to your showfile. You can do this in the field below.

In the center of the menu, you can find the different functionalities of the backup menu. They are described below.

In the top-right corner you can select a different location, e.g. to load a show file from an older software version or to save the file to a USB drive.

Press Load and select the show file you wish to load from the list afterwards. You can search for a specific show file in the search bar.

Check the boxes on the right to decide what components of the show file should be loaded. Components that are not checked will not be overwritten by the new show file.

Then press the Load button in the bottom-right corner to load the file.

Press New Show if you wish to create an empty show file. You can enter the name of the new show file in the text box.

Check the boxes on the right to decide what components of the current show file should be overwritten by the defaults.

Then press New Show in the bottom-right corner

Press Save As and enter a name for your show file afterwards to save it with a specific name. Press Save To <Drive Name> to just save it with the current name to the currently selected drive.

Press Delete and select the show file(s) you wish to delete from the currently selected drive. Press Delete again in the bottom-right corner to complete the process.

We program our first look on stage

In a few seconds you will be able to store some first looks in the grandMA3 console. Let’s have a look at this video to see how easy it is.